Online Banking#
Once you have setup online banking, you can download an OFX or QFX (Quicken Format) file from your bank and import it using the File/Import… menu.
When this happens you will see a Download tab appear at the bottom with a summary of what happened. Here we see 8 new transactions were found and merged in my Citibank VISA account:

You can click the row saying "Downloaded 8 new transactions" and it will change the Transaction view to show you those 8 new transactions only so you can quickly review them, fill in missing category information and double check everything looks good.
For a more automated download MyMoney.Net also supports OFX banking. When you have configured your OFX information correctly the download button will do the above without having to logging into websites, finding the recent activity, exporting it then importing it into MyMoney.Net. So it is a lot simpler:
If your bank is in the OFX Bank List then MyMoney may be able to download statements for you using the OFX protocol over a secure sockets (SSL) channel. If you are not sure you trust the internet for this sort of thing, please see Online Security for more information.
You can sign up for online banking features using the “Download Accounts ” menu item on the accounts panel context menu, or on the top level Online menu. This takes you to the following Online Accounts dialog. This dialog fetches known banks that support online banking (otherwise known as OFX ) and shows a list in the Name field dropdown.
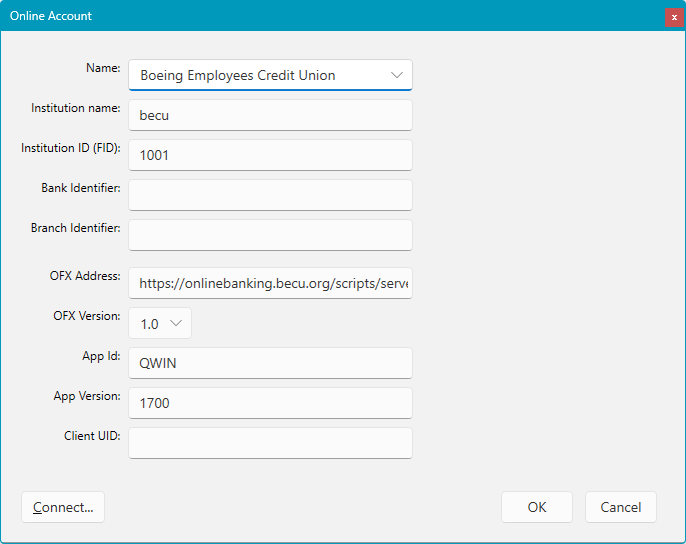
Find your bank in this list and then click “Connect…”. If your bank is not listed here you may need to call and find out what the OFX Address is, and the Institution Name and ID. Sometimes you can search the web and get the information from other financial software packages. If you still have a copy of Quicken lying around it has log files that contain this information.
When you connect, if anything goes wrong you will see a message like this.
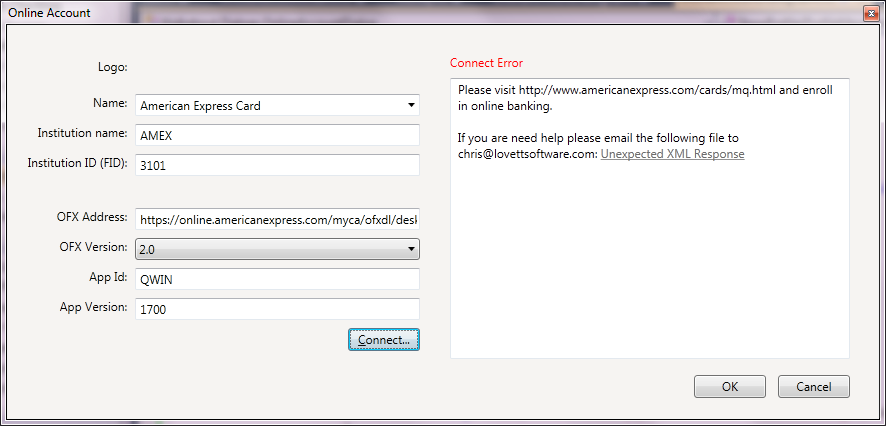
In this case you need to call your bank and ask for the online banking feature to be enabled. If you have other problems connecting to your bank, then check the Known OFX Issues for more information.
If the “Connect ” step works then it will show you the information returned from the OFX address, together with the credentials you need to logon:
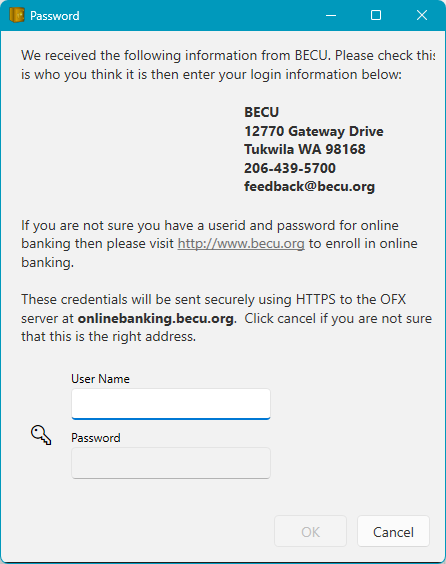
If this looks right you can enter your online banking user id and password for that bank. Included are instructions from the financial institution on how to enroll in online services in case you have not done that yet.
It is possible that your bank will also challenge you to provide more information as part of their "Multi-Factor Authentication ", or "AUTHTOKEN", or "ChangePassword" protocols.
If you enter the right authentication information then you should see your online accounts which you can then Add (if they are not already found in your list of accounts).

The question mark icon means the account number didn't match any of your existing accounts. Click this question mark button to find the matching account or add this account to your list of accounts.

If the account was found in your local database you will see a green check mark instead:
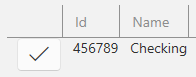
If you were expecting a green check mark, but instead see a blue question mark for a given account, then it means your account numbers don't match what was downloaded from your bank. You can go back to your Account Properties to fix your account number, then try again. Sometimes a financial institution might add or remove a dash in the account number. See Setup Accounts
Multiple Accounts at the same Financial Institution#
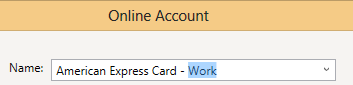
If you are tracking multiple accounts in the same Money Database that come from the same online bank (for example, you may have a personal AMEX card and one for work) then you may need two separate online accounts for that bank, with different logon credentials.
To set this up, edit the "Name" field of the OnlineAccount dialog so it is unique:
When you click Connect you will then be prompted for new credentials, type in the different credentials.
Deselecting Accounts
You can remove the online banking connection for a given account by clicking the checkmark icon to toggle the state to "disconnected" and this still stop that account from receiving future updates when you synchronize online accounts:
Downloading Statements#
Now when you click the download button the following tab appears at the bottom section of the app and when complete it tells you how many transactions were downloaded:
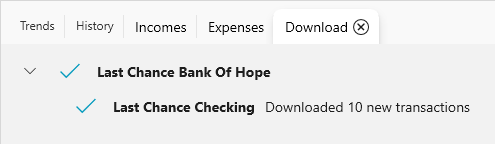
You can click the row titled "Downloaded 10 new transactions" to see the transactions that were downloaded. From there you can add missing Category information. They will stay bold as a reminder that you need to review them. A good practice is to only accept the ones you have receipts for. For example, I recently found a transaction for several thousand dollars for the purchase of a painting in Denmark on my credit card. I had no recollection of this transaction, nor any receipt, and was able to quickly inform my credit card company and start the fraud investigation the same day the charge appeared in my downloaded transactions. The bold highlighting helps make these new 'unverified' transactions more visible.
The first download will get as much data as is available from the online service. If you need more history you may be able to manually download OFX, QFX or QIF files from your bank's website and then use File/Import… to import those in the money program. You can also import OFX, QFX or QIF files from other financial software packages if you have the history there. The OFX or QFX format is preferred, QIF is harder to merge because it doesn't contain account information.
Sometimes the OFX service might be down for maintenance, and you will get an error like this:
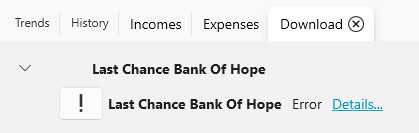
When this happens you can click the "Details" link to find out more about what happened, sometimes this contains a message from the bank as to why the service is unavailable. If this keeps happening, you can deselect the account as shown above. You can also manually remove the online connection by clearing the Online Account field in your Account Properties dialog.
Download Range#
By default for new accounts the program requests the last 30 days. After the first download it requests new transactions from the last time you clicked "Download". But if you need to you can reset the "Last Download " date using the Account Properties dialog. See Setup Accounts.
See also: Merging